Yet another Fruit Bowl - Fusion 360 plus CNC project

When we were doing the Fusion 360 sessions and I was being initiated into the world of CNC, we made a parametric fruit bowl. It was a fun little exercise and good for learning various techniques on both CAD and CNC. It also generated some feedback and observations:

  1. Two-sided machining for the blind dowel holes added complication and could be avoided by insetting “tracks” for overlapping layers.
  2. Geometry was a bit restricted by the need for each tier to fit inside the previous one.
  3. The result looked quite “geometric”.
  4. The open sides weren’t to many people’s taste, though the idea of allowing air to surround the fruit was a good one.

This led me to think that I could come up with a more eye-pleasing design that would address these items and perhaps also be a good exercise for learning how to use Fusion 360 for CNC in some more innovative ways. Also, a OneFinity CNC lives in my shop now that I’ve moved to Vancouver Island and can’t access the SDFWA shop.

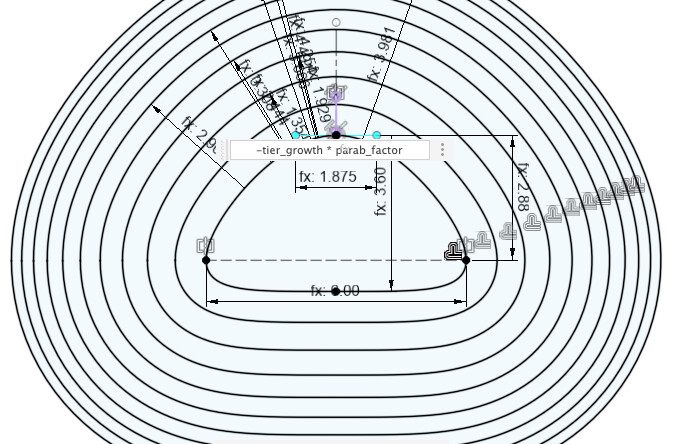
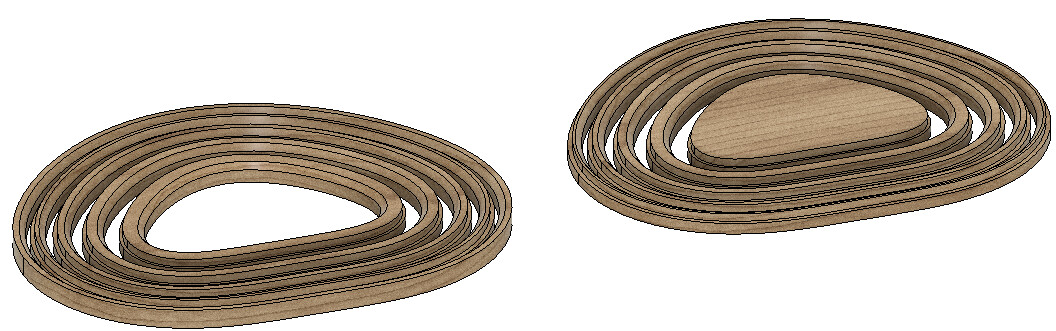
Those who attended the Design SIG meetings will expect (correctly) that the design is very parametric. Parameters not only can be altered for different sizes, but the shape and profile of the bowl are driven parametrically. This not only addresses my personal need to overly complicate designs, but is also a demonstration of multiple ways to use parameters. To allow a continuous wall, there are 2 “sets” of tiers cut out so that alternating rings can overlap. The rings are inset into each other, so it can all be machined from one side, the rings are self-aligning and easy to glue up. I’ve used local maple for these bowls, though one could even use 2 different pieces of wood and have the rings alternating in color.

If there is interest in making one, I could make a video to share how it is done and how to use the file and parameters.

1 Like

How about making a video, allowing us to distribute a link before our next Digital SIG and then having a brief show & tell plus Q&A on the project via Zoom? Mark Stook and I will be presenting digital marquetry at the next meeting and I’m sure we could carve out 10-15 minutes for this noble cause. What do you say?

1 Like

Hi Tim, great to hear from you and those look fantastic! Any chance of sharing a STEP file so I can look at those in 3D( F360 won’t run on Linux again ). If it can’t be uploaded here, feel free to email me. I love overly done parametric modeling too.

1 Like

:rofl: :joy: :rofl:

That’s the only way Tim rolls!

2 Likes

Hey DougL, great to hear from you. Here is a link to the STEP file - I’ll link the F360 file once I have a video to go with it.

2 Likes

Okay team, here are some links:

1. Video explanation of the parametrically driven fruit bowl design on Fusion 360.

2. Video discussion of manufacturing mode, generating Gcode toolpaths for the bowl.

3. The Fusion 360 file.

Have fun! Questions welcome, suggestions particularly welcome.

1 Like

Love all the flexibility the parameters provide but the little geek in my head is asking how that was designed. Did you create a path which was a function and then extrude profile sketches along the path?

Sorry, asleep at the switch here.

What I did was create a basic shape using a closed spline, and controlled the shape with parameters. I defined the additional rings using offsets with a formula based on the additional parameters (you see the formula for the first offset).
image

I used the center shape of the sketch to first extrude the base. Then I extruded each ring vertically using an offset from the sketch profile for each ring based on ring number times (material thickness minus vertical overlap). I made each ring a new body. So at this point we have a bowl with multiple bodies interfering in space. Then I used boolean subtraction to cut out each ring to fit the one above it. Edges can be rounded or chamfered, but obviously a chamfer is easier to route out.

A series of Move features is used to flatten the bowl and move alternating rings to an offset that allows them to be machined without interference.

Machining isn’t too bad. First use a v-bit for the chamfers, then an endmill for the overlap “steps” and the outlines.

Now I can make bowls without a lathe, and in non-round shapes. Clearly I’m limited in geometry, but I had fun doing it and it’s a good lesson in parametric design, and using Fusion 360 for generating toolpaths.

1 Like

Just watch the videos and I am so impressed by both the bowl design and your skills with CAD. Thanks so much for making this available and for the file. I have very few excuses to not give this a try as you’ve made it so accessible. We really appreciate your efforts from up north, Tim.

Thank you! Travis

1 Like

Awesome Tim. I have to admit this is totally out of my league but understand the basic concepts. I. am so impressed with your command of this software and also the CAM part of this to be able to generate the gCode. Thank you for sharing.

1 Like