
It’s NEVER perfect when it arrives.
Let’s figure out how to make things better.
Got a good hack? Share it so we can all benefit.
After looking at the product Travis brought to the Saturday meeting I ordered a unit to experiment with.
I’ve also now seen 3 or 4 video reviews on the product and come to the conclusion the PIA with this is going to be laser beam focusing.
So here’s my thought on a first hack:
Using the 2 mounting holes on each “leg” design and 3D print holders for Acme lead screw nuts and mount 4 acme rods with GT2 belts and
a 3D printed knob on one or more of the top ends of the acme lead screws. Basically like a Z axis only the laser engraver moves up/down.
Could even be cheap lead screws from HomeDepot instead of smooth Acme rods since accuracy isn’t super critical here.
One possible source for the Acme lead screw and nut assembly( need 4 ):
https://www.ebay.com/i/322210851299?chn=ps&var=511115246568
Doug LaRue
My personal use case is adding laser engraved signatures and designs to lathe-turned objects, like bowls and platters. As a result, the Z axis is going to vary widely.
My thoughts are to have a family of wood pieces that can be stacked to adjust the height of the laser. This is obviously crude. Better ideas welcomed!
Am game to move to Discourse when you’re ready…
Rich Kremsdorf
LightBurn hack/feature:
The laser is in the visible light spectrum so it has a built in pointer for lining up your material. One way to use it is to go into the Device Settings and enable the “Fire Button”. It should enable options in the “Move” section of the Laser tab where you can set a low laser power setting like 3%. This shouldn’t mark your work but provides a visible way to see what the laser will be doing before using the cutting/engraving powers.
Hit the Frame button while holding down the Shift key will frame with this low power laser setting.
I’m looking for ideas on how to adjust the Z axis on the Ortur laser. Doug LaRue has one above. It looks like using a screwdriver you can slide the laser up and down about an inch. Not likely to be a good solution. I think the whole frame needs to be able to slide up and down, maintain parallelism, not encroach up the work area, and be of simple design, maybe wood with some minor metal add-ons. When the laser is printing there is a lot of jiggling going so the workpiece needs to be secured as does the laser.
I’d like 3-5" of travel at least so I can sign turned objects on the bottom.
Several have talked about making a Z-axis fixture.
For now it’s just the 1" track and focus lens.
When more people have lasers let’s hold a meeting.
In the meantime, if anybody has seen a solution then by all means share!
Richard,
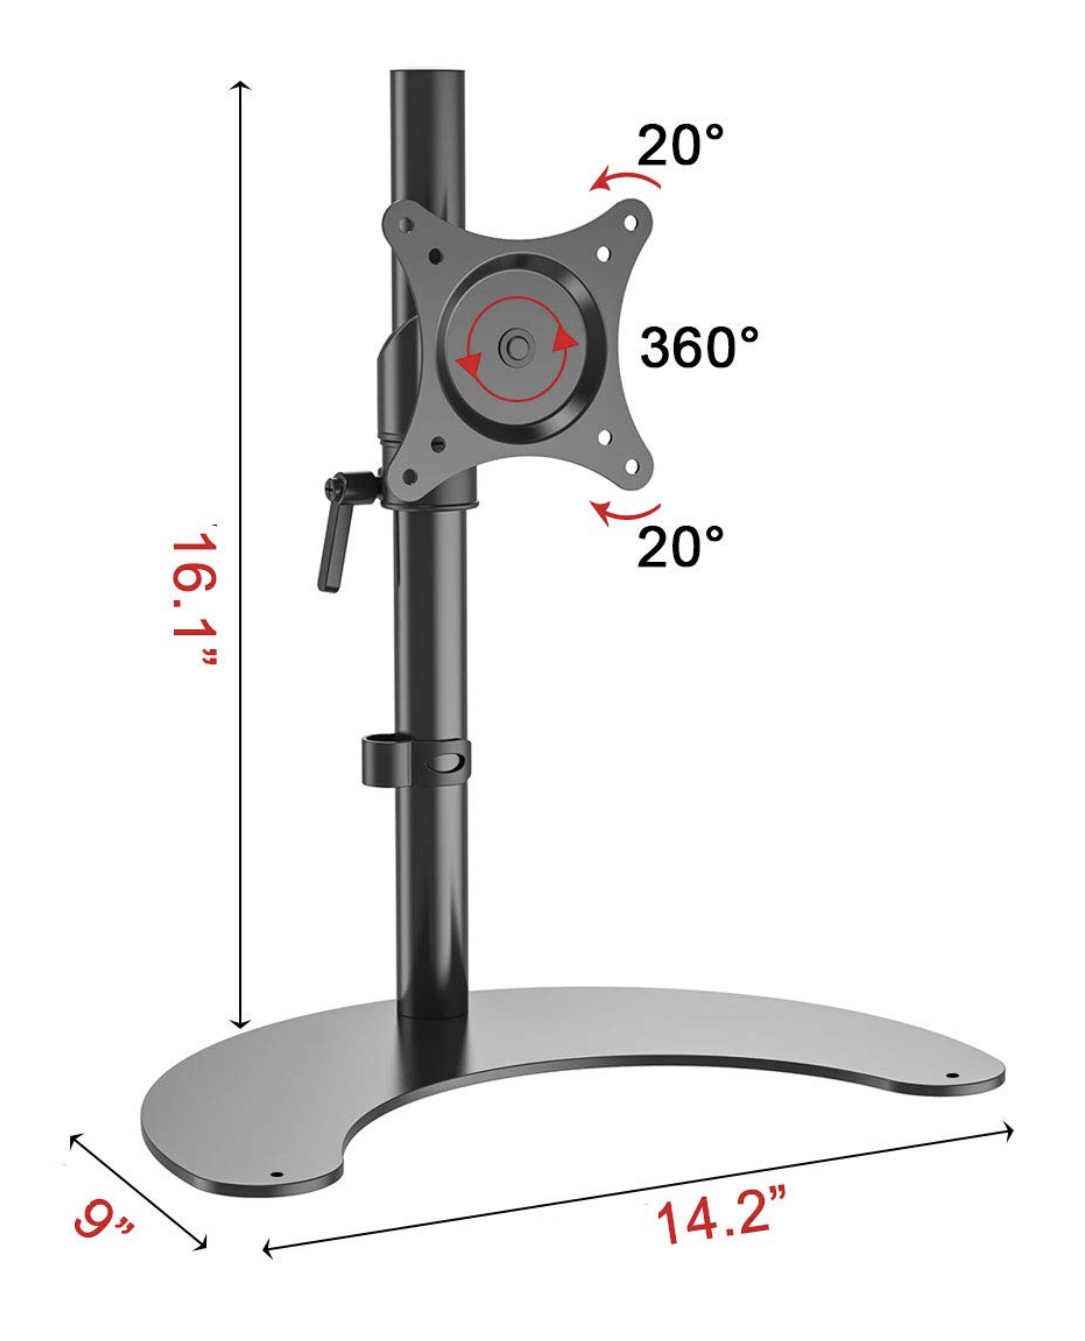
How about mounting the laser on a height adjustable monitor stand?
Swap in a custom acrylic end panel on the laser rail for mounting.
Once squared-up, you could easily raise and lower the laser.
1 Like
I like the concept of 2 pieces sliding up and down together. I imagined it would be wood, but 3D rpinted works for me, or would if I was 3D certified. I imagine sliding dovetails to maintain orientation. For my use case, 6" would be a good start.
It will need to supported on both sides because of the weight of the machine and the wiggle and jiggle as it zips around drawing lines.
I also don’t have monitor supports hanging around and available, so I creating something will be a more general answer.
Right at the moment I have to get the laser working reliably before I approach this aspect. Ortur has been “less responsive.” If we have any GRBL savvy folks looking for a challenge, I would be happy to provide a hard problem!
Richard, I wish we could figure out why yours doesn’t work predictably. I turn mine on and it works perfectly every time. Initially I hadn’t installed the Virtual Comm Port driver and connectivity wasn’t predictable but since remedying that it connects every time. Just to be sure, you did install the VCP?
yes, initially it helped but then device kept failing. I’ve repaired the install multiple times without benefit. Ortur did get back to me today. Our guy was checking people’s temperature to see if they had covid-19…
I hope you and your guys understand that if you do have a fever and any of the other symptoms of Covid-19 then you are not only likely to have it but you have been infections(spreading it) for the last 5-14 days… It spreads from your breath, not just from coughing and sneezing… Take social distancing is serious people.
Travis…is this diagram something you are designing or are you taking a design from a stand you have or are thinking about purchasing? If it is purchased what is the model and have you tried mounting or just thinking about the idea?
As you suggest, it would be interesting to see if a base could be added to the laser base and then attached to the monitor plate. I am just not sure how heavy the laser is yet and how likely it would be to tip. I think some sort of counterweight may be needed to offset the front weight of the laser.
Still waiting to receive mine, but indications are it should be in near future.to the monitor connection.
This was just an idea based on an ambition Richard is pursuing.
On Saturday we’ll be hearing Richard’s Ortur Laser story.
One topic I think he’ll be covering is Z-axis hacks.
Should be interesting!
z-axis issue
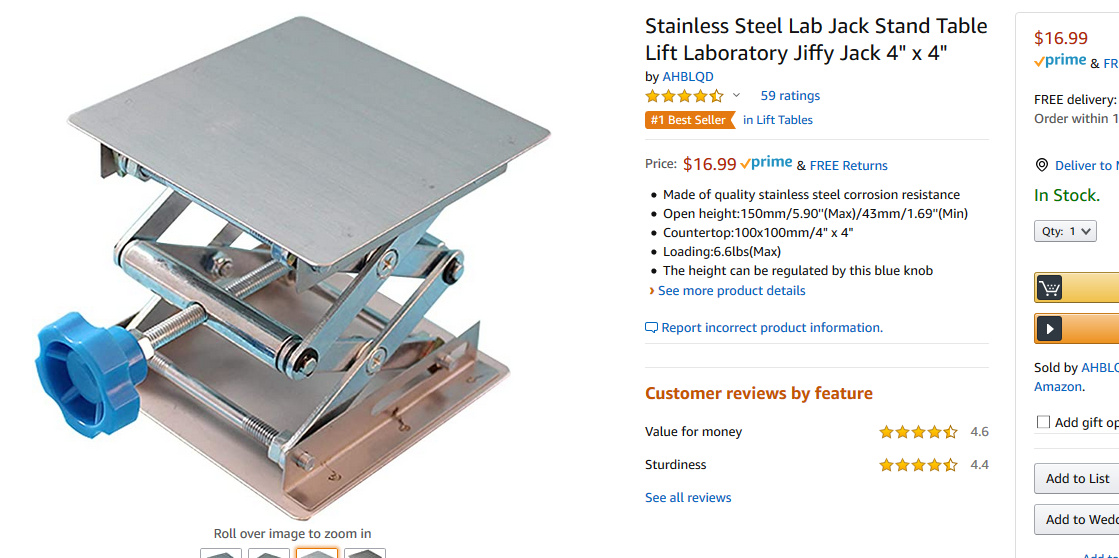
A small scissors jack platform might work. This one only goes up 6" but others can reach 15" for more $$$.
https://www.amazon.com/Stainless-Steel-Stand-Table-Laboratory/dp/B07KDXJGX9?ref_=s9_apbd_orecs_hd_bw_bHLhYB&pf_rd_r=0J9QWX7D9937PFW5EDNN&pf_rd_p=18837b15-732f-5a52-a4da-eefc4032c127&pf_rd_s=merchandised-search-11&pf_rd_t=BROWSE&pf_rd_i=256370011
1 Like
so the idea would be to mount the laser cutter much higher and use the jack to raise or lower the cutting object?
That might be best to keep the laser solidly mounted.
Brilliant. the 8" model gives about 8.5 " of travel which is plenty. The knob can be used to adjust focus, meaning the laser box won’t need to be fiddled with and it can aligned properly and kept there. Need a smaller square!
I’m thinking about a 3 sided box to lift up the laser supports, mounted to a plywood base to give it rigidity. Will do some measurements to sort out how high the supports need to be.
Thank you wiltonkirk and the forum!
We have one of these jacks at the Shop that we use with the rotary attachment.
Perhaps someone could give it a try … um, when the Shop opens! 
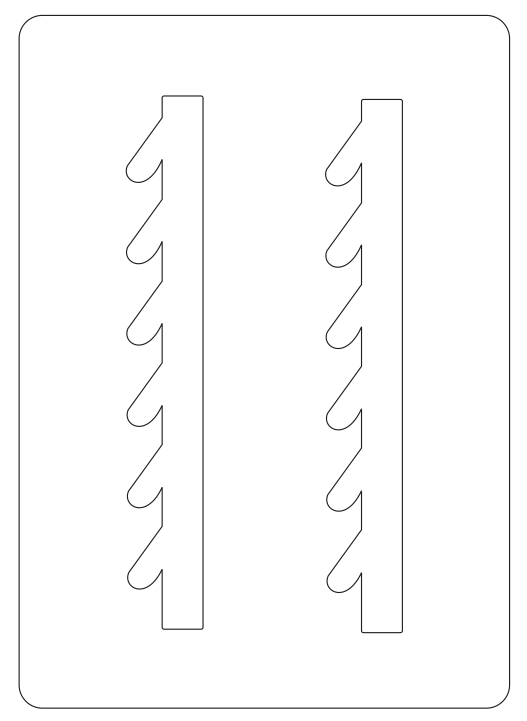
Here’s a version of the idea to extend the vertical slots where the laser head mounts.
By having steps up both tracks the head can settle in and be kept level.
I think Doug is considering a prototype when his Ortur arrives.
My laser arrived today!